Growing Monstera Deliciosa from Seed

Monstera Plant Leaves

So you want a whole garden of little monsters? Great! I took this project on a while back and loved the plants that I managed to grow. While it’s not terribly difficult to actually grow the plants, I found it tough to find information easily online. I’ve decided to start this project over again and document it for everyone else who decides to give this a shot.

By far the most difficult part of this is finding real viable Monstera seeds. Ultimately I couldn’t find any websites selling seeds locally so I had to turn to eBay. If you’ve ever shopped for seeds on there it’s very hard to discern what is a true and honest listing from a fake one. Unfortunately it’s a common scam because a lot of people don’t know what the seeds look like to begin with. Here are some photos I took of what they actually look like.

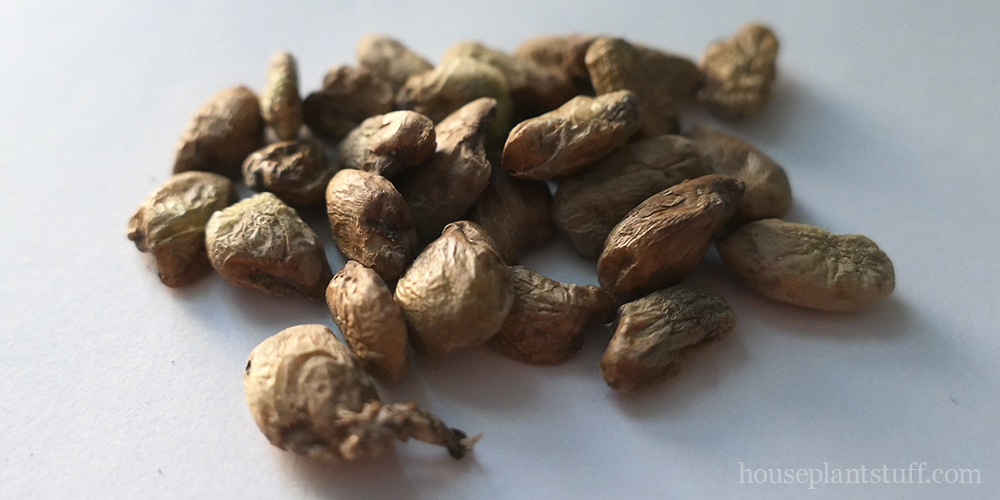
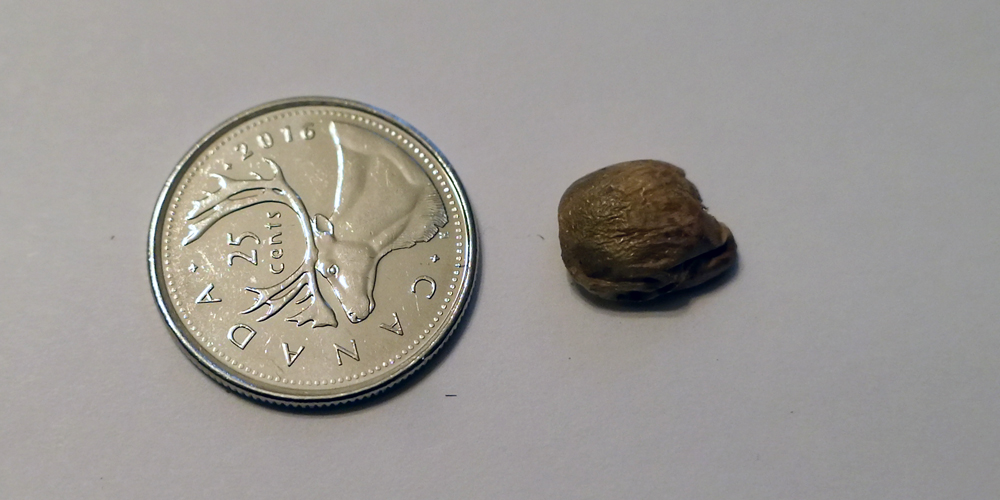
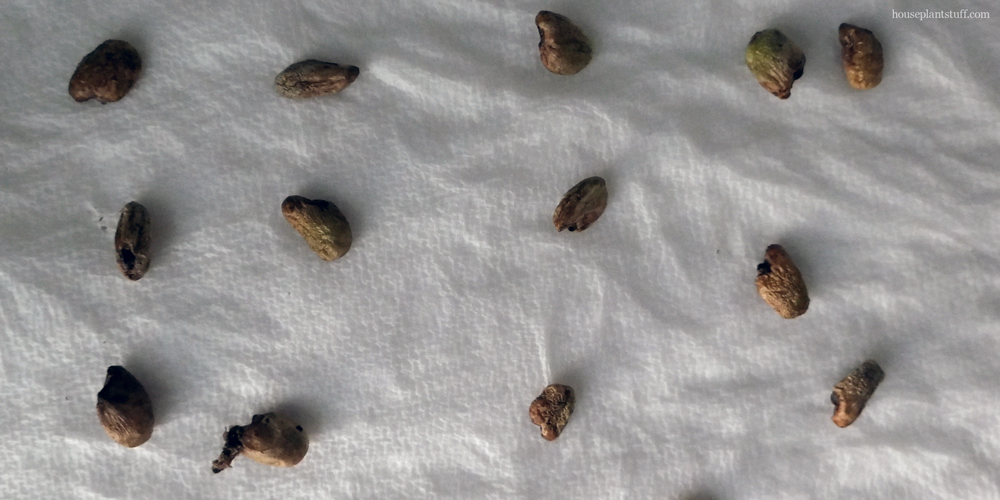
In general they are about the size of a pea. The seeds are yellow with a greenish tinge and both times I purchased seeds they had a fine skin on them. I assume this is from the harvesting process. Both times I ended up ordering seeds that were shipped from Italy. In my case, this meant that my seeds spent a few weeks in the mail and because I’m impatient and ordered near the end of winter – they probably didn’t see great weather.

From what I have read anecdotally monstera deliciosa seeds do not travel well and do not keep well because they do not remain viable dried out. I have no source on this information but both times a number of seeds I received were mushy and did not germinate. This could also be due to poor harvesting or packaging, but I had no controls in place for that.

Previously I was able to germinate seeds in damp paper towel in a sandwich bag on top of the fridge for warmth, as well as placed directly in soil. I also experimented with seeds in rockwool which grew quite well but faltered with transitioning into soil. This time around I tried both paper towel and soil methods again. I’ll be placing these near an east facing window and I’ll update soon.

Update #1

Good News
We have a sprout! The first leaf has sprouted up. Last time I grew these I was very impatient so it’s encouraging to see signs of life this early.

Bad News
Unfortunately a large number of seeds continued to rot away. Of twelve seeds in paper towel, nine of them became mushy or moldy before they germinated. I could have soaked the seeds before or provided a more sterile environment as I believe that some of these probably rotted from being too close to another rotting seed. I also should have discarded more non-viable seeds before trying to plant them all. I ended up moving the rest of the seeds into sterilized soil.

Houseplants for Low-Light

snake plant

While everyone loves houseplants, not everyone has sunlight available. We’d all love to have floor to ceiling windows in all directions but unfortunately that’s not reality. A large number of planthusiasts are simply stuck with sub-optimal lighting. While there are a ton of lists that will suggest some low-light plants, I’m going to try a different approach. By understanding how to grow houseplants in low-light you can make better decisions and take excellent care of your plants.

Why Do Some Houseplants Need Less Light?

All plants need light for photosynthesis to occur. If you remember back to grade school, plants use photosynthesis to convert light energy into chemical energy that it can then use to grow. So how can low-light plants survive without lots of direct sunlight? The short answer is: adaptation. Consider where that plant would live outside in nature.

What we call houseplants are just outdoor plants that will survive in the same conditions we prefer in our homes. Out in nature though, these plants that have adapted to need less light for a number of reasons. Plants have adapted to all kinds of growth conditions in the wild. Many of the plants we consider houseplants are actually tropical plants. In the tropical forests some plants live beneath the canopy of leaves and never receive direct sunlight. If you can imagine how it is very bright without having direct sun, then you can imagine the conditions these plants have adapted to.

What is Low-Light for a Plant?

With a few extra-ordinary exceptions, light is a requirement for plants. For low-light houseplants they are able to survive on a minimal amount. Low-light can be considered any bright spot with no direct sunlight. A general minimum guideline is within 15 feet of a northern window. In the northern hemisphere a northern window provides the least light, so if you’re in the southern hemisphere – reverse that. In either hemisphere east and west facing windows will be your brightest sides.

Low-light does not mean no light. Without any windows at all though, low-light plants can be happy with eight to ten hours of bright indoor lights. If all else fails you can always get an affordable grow light. If you really want a plant that will grow with no light at all I strongly recommend a nice plastic one.

How Can You Tell if a Plant Isn’t Getting Enough Light?

If you’re concerned that you’ve picked a spot that’s maybe too low-light for your plant, watch how it grows. All other things equal, a plant without enough light will go looking for it. If you start to see your plant stretching or becoming etiolated, that means it needs more light. A plant will put out longer stems and leaves to try to reach out around obstacles keeping it from precious light resources. Dig up the photos you took of your plant when you bought it (you did take a selfie, right?) and compare. Other tell-tale signs of insufficient light can be smaller new growth and the plant looking pale or dull.

When the Light Isn’t Low Enough

So if plants need photosynthesis to grow, and they need light for photosynthesis, shouldn’t we just blast them with light constantly? Turns out, no. Too much light can cause leaves to yellow and die, and can literally cook the plant. If the plant is getting more light than it can handle it will find a way to get less which in most cases means getting rid of leaves one way or another.

For many plants parts of photosynthesis only occur when it’s ‘night’ or dark. If the lights never go off, the plant can become disrupted and unable to maintain itself. Consider this when adding supplemental lighting, or placing a low-light plant somewhere with 24 hour lighting. Think back again to the conditions it would have adapted to outside. While there are some plants near the poles that are used to long stretches of dark, there is usually a balance.

Happy Healthy Low-Light Plants

Low-light plants are a great way to bring houseplants to places indoors that the sun just doesn’t reach. While it’s easy to assume all plants want as much sun as possible, it’s better to consider that each plant wants as much light as it has adapted to. Always take the time to discover what your plants’ light needs are. Once you understand what the plant requires it becomes much easier to choose and place your indoor plants in spots that work for both of you.

Understanding Drainage

Having a good grasp on the relationship between plants and water is crucial to finding success growing houseplants. We all know plants need water to survive, but with poor drainage, that water can do more harm than good. Standing water in plants can cause roots to rot, promoting fungus and disease. By understanding proper drainage, and how it works in potted plants, you can make your plants much healthier.

What is Drainage, Anyway?

Drainage refers to how effectively water can move through your plant’s soil. In a good drainage situation, water doesn’t stand, and can flow freely. It’s important that water isn’t allowed to stand in your plants, because it can cause a number of problems. There are three different aspects of drainage – pots, soil and watering. Making sure your plant is in the correct pot, with the right soil, makes watering much easier.

Drainage Tips for Pots

Drainage holes are holes in the bottom of plant pots that allow extra water to flow out after watering. These also allow for air to enter into the soil which is also crucial for plant health.

If you happen to over-water a plant that lives in a pot without drainage holes you’ll have a few problems to deal with. First, it’s hard to tell if water is sitting in the pot, as it will sink to the bottom. If there is, the plant will be difficult to dry out without emptying it out.

Some people suggest using stones in the bottom of a pot to help with drainage but this actually has the opposite effect. Picture your soil like a sponge – it won’t actually drip water into the gravel below until the soil is absolutely full of water. This is called a perched water table.

So what to do about the lovely pots you’ve found that don’t happen to already have any drainage? An easy solution is to use them as cache pots. Place your plant in a plastic nursery container and then inside the desired pot. This allows you to easily check for standing water, while making it easier to switch pots or move your plant around. You can use gravel if you would like since your inner pot will drain through into the gravel. If you’re feeling handy, you can also pick up a tile or glass drill bit and add a drainage hole yourself.

Drainage Tips for Soil

Quick draining soil is important for a number of reasons, as different types of soil retain water at different levels. A peat based soil mix will hold moisture longer than a bark based, or gritty mix. It is entirely possible to grow a succulent in garden soil, or a pothos in orchid mix but it will be a lot harder maintaining the right type of moisture for your plants.

You can help water to drain through soil by amending it with things that do not absorb water, or break up the density of the soil and allow air in. Typically something like perlite, bark fines, or crushed granite can be added to keep soil from packing down too densely.

Drainage Tips When Watering

In general, plants drink water from their roots which are spread throughout the soil. When watering ideally we give all of those roots access to water for enough time to drink without drowning. Water thoroughly, taking care to distribute the water around the pot lightly and evenly. Water until a bit comes out through the bottom of the pot and discard excess water after a few minutes. Never let your plant sit in water. It is better to water fully and less frequently than too frequently, or not enough water.

The Bottom Line

Having a grasp on what drainage is and how it affects your plants can help manage and eliminate the conditions that encourage root rot, mildew, mold, and pests. Use this knowledge along with an understanding of how your individual plant enjoys being watered, and your plants will grow and thrive. Of course prevention is still the best cure – if you have good soil and can water properly then drainage issues are less of a concern.

How to Grow Pothos in Water

pothos plant growing in water

Pothos are one of the most popular houseplants. They are resilient, fast growers, and produce attractive foliage with little maintenance. Like many plants, it’s possible to grow pothos in water instead of soil. Many indoor gardeners struggle with watering their houseplants properly, growing in water eliminates that problem.

Water – Not Just For Propagating!

When we think of growing pothos in water, we think of taking cuttings to make more plants. Taking cuttings, or propagating these plants is easy and doesn’t take much time. The cuttings are placed in water and once they start to root, are moved into soil to continue growing long-term. But, they can also simply be left in the water! Keeping a few things in mind, those cuttings will be more than happy to stay submerged forever.

Why Grow Pothos in Water?

Growing in water can be useful if you have concerns about soil creating a mess, or if you have concerns about allergies. If you’re dealing with pets or kids having less dirt around is a big plus. A pothos can be a good choice in places like an office where regular watering can be difficult to maintain. Using water gives you many more container options, and the “see-through” look creates a unique design look in your home.

Don’t Plants Need Soil to Grow?

For plants to grow, conventional wisdom says they need sun, water and nutrients. While we usually think of plants getting nutrients from soil, many of them can also get them from water. Pothos, with its hardy personality, is able to extract the necessary food from the water – but you will have to fertilize it. You can do this by either diluting regular fertilizer or using a few drops of liquid fertilizer in the water. This is similar to hydroponic set-ups that commercial farmers use to produce vegetables in hyper-optimized conditions.

Can I Move my Pothos From Soil to Water?

A pothos grown and established in soil will have a different type of root structure than one grown in water. If you uproot your pothos and place the soil roots in water they will likely drown and rot. If you want to transition your plant to water it’s a good idea to take cuttings instead. This will allow the plant to grow roots that will thrive in water.

In the case of a plant that has suffered and must be moved – remove all damaged and affected roots and re-root in water.

Can I Move My Pothos From Water to Soil?

Similarly, a pothos that has been rooted heavily in water will struggle in soil. The roots won’t be developed properly to take in water and nutrients. Pothos propagated in water and then moved to soil while roots are developing can usually cope with this, but you can help the process along by creating a high-humidity environment. That said, pothos is a very hearty plant and in some cases can handle the transition with only temporary effects.

How to Grow Pothos in Water

You’ll need a water-proof container that is sturdy enough to last for months or years without breaking down. A container made of glass is a great choice because it’s less likely that contaminants will leech into the water. Metal can rust, and some plastics can break down over time. It’s a good idea to sterilize your container before rooting.

It can be fun to use a clear container so that you can watch the roots develop, but water and sun can create conditions for algae to grow. If you’re using a clear container like a mason jar – keep an eye out for green growth.

Once you have your container ready simply add water. If you have hard or heavily chlorinated tap water, avoid using it if possible. Distilled water, filtered water, or bottled water make good alternatives.

It’s easiest to add pothos cuttings to the water and place them in indirect bright sunlight. Once roots have developed, you can add a diluted amount of fertilizer to give your plant the nutrients it needs. Avoid fertilizing too much or too early so you don’t “burn” the plant.

Maintenance for Pothos in Water

Keeping your pothos happy in it’s home is slightly different when it’s in water. Sitting water is slowly losing oxygen, nutrients will deplete as the plant uses them and water will naturally evaporate. Top up the water to keep the roots submerged when the water gets low. Change out the water completely if it becomes cloudy or discoloured. Remember to add dissolved or liquid plant fertilizer during the growing season to keep your plant well-fed and happy.